Garden Planning 2024
- Elizabeth Chabassol
- Apr 16, 2024
- 6 min read

Another snowstorm is passing through and I am sitting here with my tea watching the snowflakes fall like rain. While my garden could really use the moisture, I am dreaming of spring. I ache to get my hands into the soil. Gardening is my favourite stress reliever, but for now I wait.
So, what do I do in the meantime? I plan. Dreaming about what veggies and flowers I will plant is a fun way to take a break between everything else I have to do. While a majority of my planning is complete for this year, I thought I would share just how I go about it.
My Veggie Garden
Every garden has a history and mine is no different.
It all began many years ago when we were looking to purchase a home. I had a couple of things that I had to have, one was a kitchen with lots of counter space and the other was a large backyard. I knew I wanted to be able to have gardens. We bought in what was then a new development and got in just before the housing boom jacked up prices to ridiculous levels.
Over the years I have put in a few flower gardens, but I am not going to go into detail about them right now. I am going to focus on my veggie garden. Why? Because right now with rising food prices a veggie garden is a better choice than flowers. Although there are flowers you can eat, most people won’t. So, we head back to the veggie garden and my first step.
Location
When I first put in my garden, I did not take as much time to consider the location as I should have. My primary concern at that time was keeping our Golden Retriever and my toddler out of the garden and doing it as cheaply as possible. Unfortunately, this meant that after about 5 years I ended up doing the work all over again when I had to move it. So, I am going to give you tips that I didn’t consider when I put in my first veggie garden to hopefully save you the extra work.
First, study your yard. Take the time to observe how the sun moves across it. Where is it fully sunny and where is it shady? Remember that sun position changes throughout the growing season. What could be a little sun in the spring could be too much in the summer or it could be too little if a nearby tree has not leafed out yet.
Check out the grade of your property and your drainage. Where does the rainwater puddle? Where is it dry? Too wet and you will end up fighting damp diseases. Too dry and you will have to water your plants. This could be problematic if your city puts in water restrictions.
Be sure to ascertain where your city/town Utility Rights of Way are. This important to know. Anything you plant on a Right of Way can be dug up by the City or utility providers. They will do so if they think it is necessary. Many things can be worked around if you know about them before hand.
After much consideration you have your garden location. Now comes the hard work. Removal of any sod, turning the soil, putting in a fence if wanted or required. Once that is done, it is time to test your soil. In my opinion, soil testing should be done when you first put in a new garden and then at least every couple of years after. There are testing kits available at your local garden centers. These commonly test levels of nitrogen, potassium, phosphorus, and pH. You can also go big and have a lab test your soil for you. This will give you a more detailed story about your soil. If you wish to have an organic garden, lab testing may be a good idea to prove that the soil is not contaminated with heavy metals or chemicals. Contamination can happen even if you do not use chemical fertilizers.
So, you have completed your soil testing and added compost, blood or bone meal, and any other required soil enhancements, organic or otherwise, according to your needs, to the soil.
Now you need to decide what you are going to plant. To do this you should first make sure you know your Plant Hardiness Zone. A Plant Hardiness Zone provides information that includes minimum and maximum annual temperatures, first and last frost-free days, the number of frost-free days (growing season), wind and average annual precipitation (rain/snow). Using this information, you will know when to plant outside and if you need to start some plants inside. Zone also correlates with which plants will do well in your zone. In zone 4a, a zone 7 plant may not survive or will need extra attention to have a fighting chance. A zone 7 perennial may only be an annual in zone 4a.
Garden Layout
The last thing to do before you plant is to create a garden layout. This is more important than you may think. A garden layout will give you a better idea of how much room you have and how many plants you will need to possibly start indoors. You don’t want to purchase or start 12 tomato plants if you only have room for 2.
My first garden layouts were just drawn on graph paper but I found that moving things around and having to erase over and over just destroyed the paper. In many cases I would have to draw out the plan several times using several pieces of paper. This does work for some people and can give you a pretty layout if you are artistically inclined.
I, however, switched to using my computer. I created the following charts in Word.
1. Garden Layout – a graphic scale representation of my garden. Each square is equal to a foot. My garden is basically a rectangle so this works well.

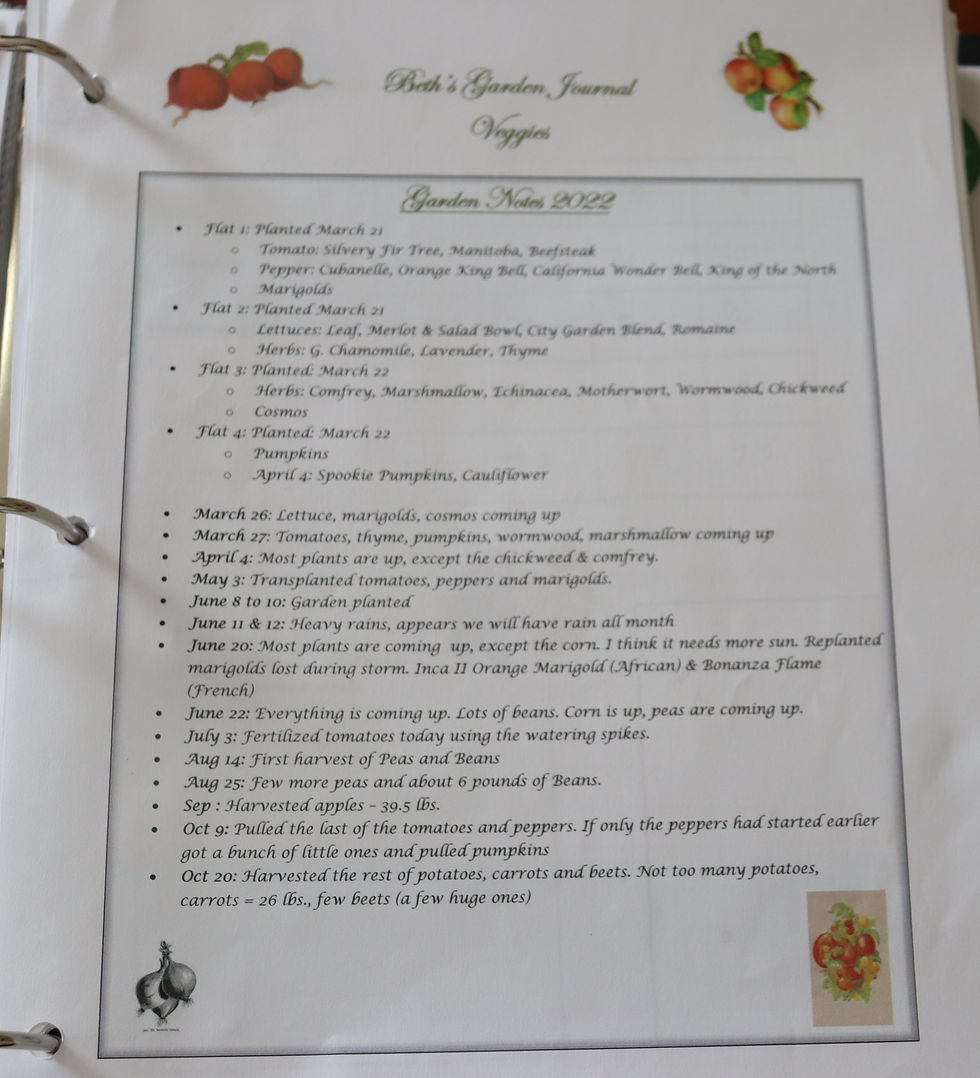
2. Veggie Page #1 – a list of the plants/seeds I am planting, where I purchased them, planting dates, whether started indoors or directly in the garden, days to harvest and harvest date

3. Veggie Page #2 – a place to take more detailed notes of the garden progress, including what seeds are in each flat started indoors, when they started to sprout, what is successful or having problems, weather issues, etc.
4. Supplemental Pages – seed packet information (planting depth, etc.), soil testing results, Biodynamic crop rotation charts

I use these charts simultaneously to achieve a workable garden plan. As they are in Word, I just pull up last year’s charts and clear out the information I don’t need this year. I have these pages stored on my computer but I also print the plan to take with me into the garden when I plant. Other pages are printed at the end of the season and stored in my gardening journal.
I generally plant the same veggies every year, so I start with my list on Veggie Page 1. I then pull up my garden layout graph. Referring back to previous years, I layout where I intend to plant each one. There is a lot of flipping back and forth to refer to pages. My garden layout is divided into beds which are represented by squares on the graph.
When creating a layout, you must consider the needs of each plant. A tomato plant is going to need more room than a bean plant. Lettuce needs more shade than corn. This information is usually found on the back of the seed packet you are using. The package will give seed depth, spacing, zone that is best planted in, and if the seedlings will need to be thinned. For the last couple of years, I have been using a Seeding Square to get my spacing just right. I used stakes and string for years, but I find the Square is easier to use as I get older.
You must also ensure that you are not planting the same thing in the same place every year. Crop rotation helps to reduce infestations of pests and weeds and assists in the even use and distribution of nutrients in the soil. Crop rotation can also reduce reliance on soil additives. If you are interested in the benefits of returning to a more natural way of gardening and improving your soil, I would suggest looking into biodynamic gardening and permaculture.
So, your garden is now planned. Just have to wait for the snow to melt and the ground to warm up. Planting out will start around mid May, depending on the weather and I am usually finished the veggie garden by June 4.
Wishing you a great and simple planting season. Enjoy!
Additional Resources: planthardiness.gc.ca; plantmaps.com; Calgary Horticultural Society or your local horticultural society, many gardening books


Comments